
Web Component - Pay Element
Integrate and use the NoFrixion Pay Element Web Component in your web page to allow your customers to complete a payment flow with ease
👋 Introduction
In this guide you'll learn how to integrate the NoFrixion Pay Element Web Component!
The NoFrixion Pay Element is a user interface that enables a merchant to receive payment for products or services. This guide will introduce you to the key concepts related to the Pay Element and provide a step-by-step implementation.
The guide includes a handy TL;DR section for those who want to dive right into the code feeling bold. However, we highly encourage you to read the entire guide, as it introduces crucial concepts.
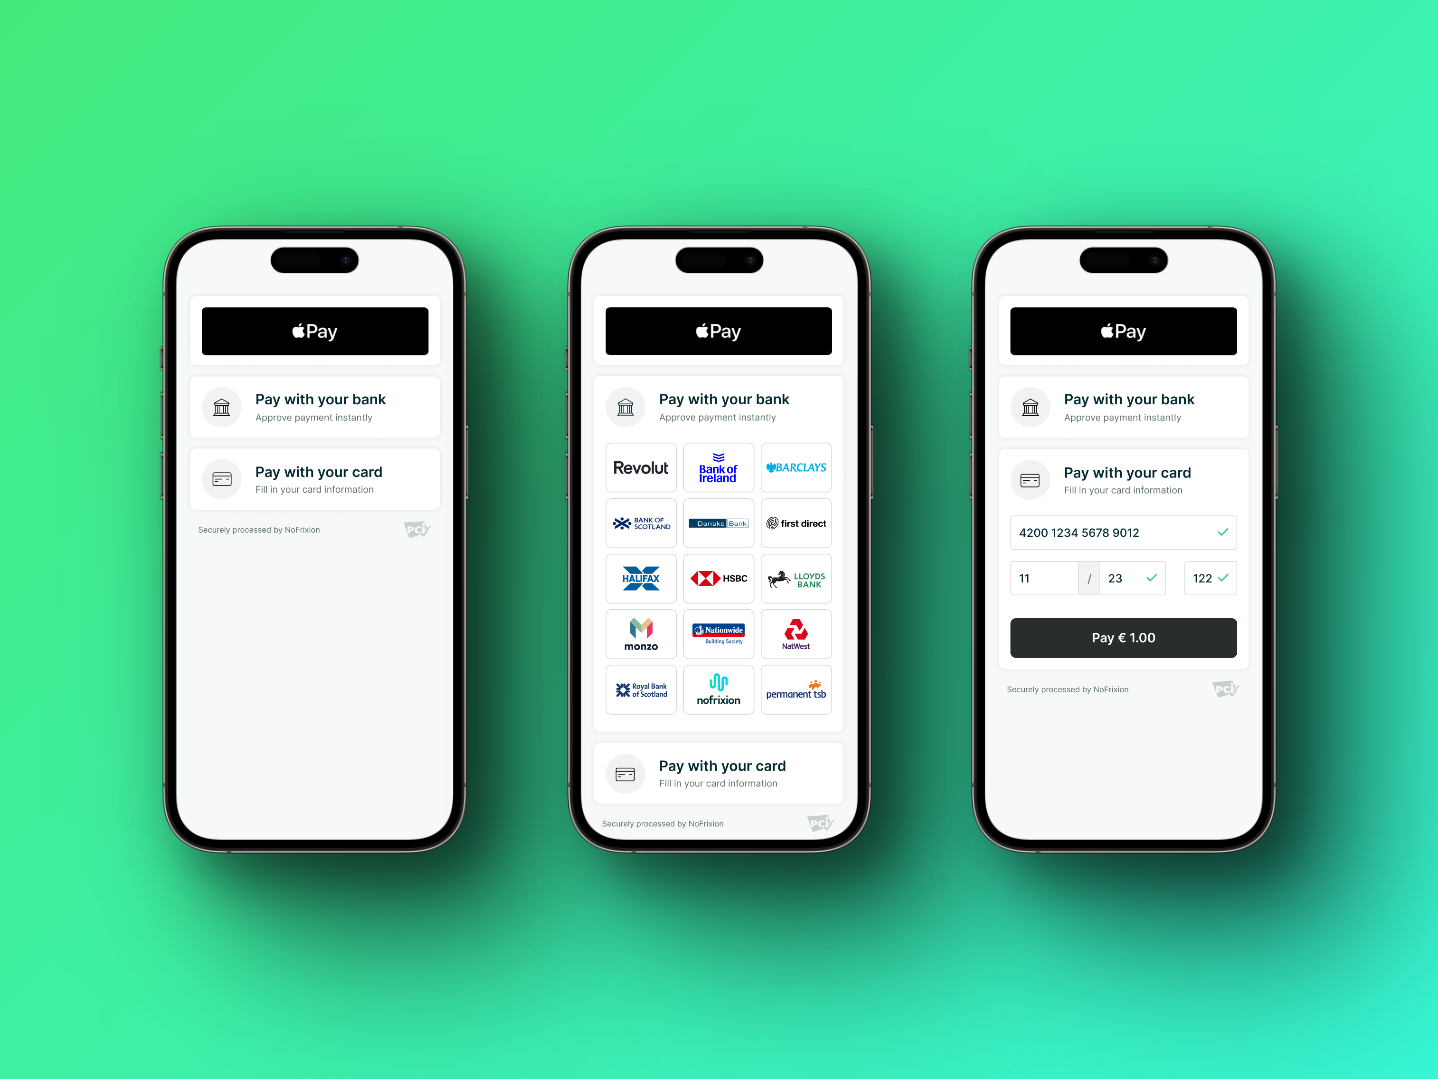
This is how the Pay Element looks on mobile!
🏃♂️💨 TL;DR
- Create a Payment Request by calling the MoneyMoov API
- Replace
{YOUR_PAYMENT_REQUEST_ID}in the code example below with your payment request id from the previous step- You're all done 😎
<!DOCTYPE html>
<html>
  <head>
    <meta charset="UTF-8" />

    <!-- 👇🏻 Add NoFrixion JavaScript library  -->
    <script src="https://cdn.nofrixion.com/nofrixion-nextgen.js" charset="utf-8"></script>

  </head>
  <body>

    <!-- 👇🏻 Embed NoFrixion Pay Element Web Component  -->
    <nofrixion-pay-element
        paymentrequestid="{YOUR_PAYMENT_REQUEST_ID}"
        apiurl="https://api.nofrixion.com/api/v1"
        >
    </nofrixion-pay-element>

  </body>
</html><!DOCTYPE html>
<html>
<head>
<meta charset="UTF-8" />
<!-- 👇🏻 Add NoFrixion JavaScript library -->
<script src="https://cdn.nofrixion.com/nofrixion-nextgen.js" charset="utf-8"></script>
</head>
<body>
<!-- 👇🏻 Embed NoFrixion Pay Element Web Component -->
<nofrixion-pay-element
paymentrequestid="{YOUR_PAYMENT_REQUEST_ID}"
apiurl="https://api-sandbox.nofrixion.com/api/v1"
>
</nofrixion-pay-element>
</body>
</html>
Note that the URLs provided in this guide point to the Production environment, so make sure you're using the correct one (sandbox/production) accordingly.
| Sandbox | Production | |
|---|---|---|
| API | https://api-sandbox.nofrixion.com | https://api.nofrixion.com |
💻 Implementation Guide
ℹ️ Key concepts
Payment Request
A Payment Request is an object that represents the merchant's intention to get paid, similar to an invoice. It contains information such as the amount, currency, and available payment methods. Since the Pay Element is the UX/UI representation of a Payment Request, you'll need to create one via an API call from your server, which will be used as a parameter when using the Pay Element web component.
🔐 Security
Due to the high security standards required for handling transactions, the NoFrixion Pay Element web component provides a convenient way to handle sensitive payment details without storing them on merchant systems. When processing a card payment, the Pay Element web component communicates directly with our payment gateway, so merchant systems don't need to process or store card details.
📃 Preconditions
As mentioned in the Key Concepts, the NoFrixion Pay Element Web Component needs to be linked with a payment request. To create a Payment Request, you need to execute an API call from your system so that you can pass the payment request ID to the Pay Element. If you want to know how to do this, please click click here.
To make your life easier, here's a cURL command that you can copy and paste to create a Payment Request.
You'll need to replace {YOUR_MERCHANT_TOKEN} with your actual merchant token. Here is how to get your merchant token.
curl -s --location --request POST 'https://api.nofrixion.com/api/v1/paymentrequests' \
  --header 'Authorization: Bearer {YOUR_MERCHANT_TOKEN}' \
  --header 'Content-Type: application/x-www-form-urlencoded' \
  --data-urlencode 'amount=10.99' \
--data-urlencode 'Currency=EUR'curl -s --location --request POST 'https://api-sandbox.nofrixion.com/api/v1/paymentrequests' \
--header 'Authorization: Bearer {YOUR_MERCHANT_TOKEN}' \
--header 'Content-Type: application/x-www-form-urlencoded' \
--data-urlencode 'amount=10.99' \
--data-urlencode 'Currency=EUR'🛠️ Step-by-step
- The entire Pay Element logic, including security, rendering, and displaying of payment options, is inside the NoFrixion Javascript library. You can find this library in NoFrixion's CDN at https://cdn.nofrixion.com/nofrixion-nextgen.js. Add this library to your
<head>tag.
<head>
  <meta charset="UTF-8" />

  <!-- 👇🏻 Add NoFrixion JavaScript library  -->
  <script src="https://cdn.nofrixion.com/nofrixion-nextgen.js" charset="utf-8"></script>

</head>-
To include the Pay Element on your website, utilize the
<nofrixion-pay-element>tag, and provide the following properties to the web component:paymentrequestid: This is the ID of the payment request that you created in the preconditions section.apiurl: This property specifies the Nofrixion API URL depending on whether it is for Production/Sandbox.openbydefault(Optional): This is an optional property that determines the payment option you would like to be expanded by default. For example, if you want the card section to be open by default when the pay element loads then set this parameter tocard. This can take either of two values -cardorpisp.countrycode(Optional): This is an optional property that’s only used when Pay by Bank is enabled in the PaymentRequest. This property accepts a two-character country code. When a country code is provided, the Pay Element will display all supported banks for that country. If the banks list is greater than fifteen, a search box will be enabled where the user can search through all supported banks of that country.displaybankscountrycode(Optional): This is an optional property that’s only used when Pay by Bank is enabled in the PaymentRequest. This property accepts a two-character country code. This property is used to control the initial view of the banks list. When a country code is provided fordisplaybankscountrycodethe initial view will be of supported banks for that country. All other supported banks will be searchable through the search box.
Note we do not recommend usingcountrycodeanddisplaybankscountrycodetogether in the Pay Element.countrycodewill only display banks for that country.displaybankscountrycodewill have all banks with the initial view of banks from that country indisplaybankscountrycode.
Replace{YOUR_PAYMENT_REQUEST_ID}with the actual value you got from the Payment Request creation call (please read the Preconditions section).
<body>
      // Pay element web component.
      // Properties passed are:
      // 1. Payment request ID: This is the ID of the payment request that you created in the preconditions section.
      // 3. API URL: This property specifies the Nofrixion API URL depending on whether it is for Production/Sandbox.

      <nofrixion-pay-element
        paymentrequestid="{YOUR_PAYMENT_REQUEST_ID}"
        apiurl="https://api.nofrixion.com/api/v1"
        >
      </nofrixion-pay-element>
<body><body>
// Pay element web component.
// Properties passed are:
// 1. Payment request ID: This is the ID of the payment request that you created in the preconditions section.
// 3. API URL: This property specifies the Nofrixion API URL depending on whether it is for Production/Sandbox.
<nofrixion-pay-element
paymentrequestid="{YOUR_PAYMENT_REQUEST_ID}"
apiurl="https://api-sandbox.nofrixion.com/api/v1"
>
</nofrixion-pay-element>
<body>Putting all the pieces together, the entire code should look like:
<!DOCTYPE html>
<html>
  <head>
    <meta charset="UTF-8" />

    <!-- 👇🏻 Add NoFrixion JavaScript library  -->
    <script src="https://cdn.nofrixion.com/nofrixion-nextgen.js" charset="utf-8"></script>

  </head>
  <body>

    <!-- 👇🏻 Embed NoFrixion Pay Element Web Component  -->
    <nofrixion-pay-element
        paymentrequestid="{YOUR_PAYMENT_REQUEST_ID}"
        apiurl="https://api.nofrixion.com/api/v1"
        >
    </nofrixion-pay-element>

  </body>
</html><!DOCTYPE html>
<html>
<head>
<meta charset="UTF-8" />
<!-- 👇🏻 Add NoFrixion JavaScript library -->
<script src="https://cdn.nofrixion.com/nofrixion-nextgen.js" charset="utf-8"></script>
</head>
<body>
<!-- 👇🏻 Embed NoFrixion Pay Element Web Component -->
<nofrixion-pay-element
paymentrequestid="{YOUR_PAYMENT_REQUEST_ID}"
apiurl="https://api-sandbox.nofrixion.com/api/v1"
>
</nofrixion-pay-element>
</body>
</html>➕ Additional Information
Payment Methods in Payment Requests
The Pay Element web component will display different methods based on what was defined when creating the payment request. In the image below, you can see how the Pay Element will show different methods for different payment requests.
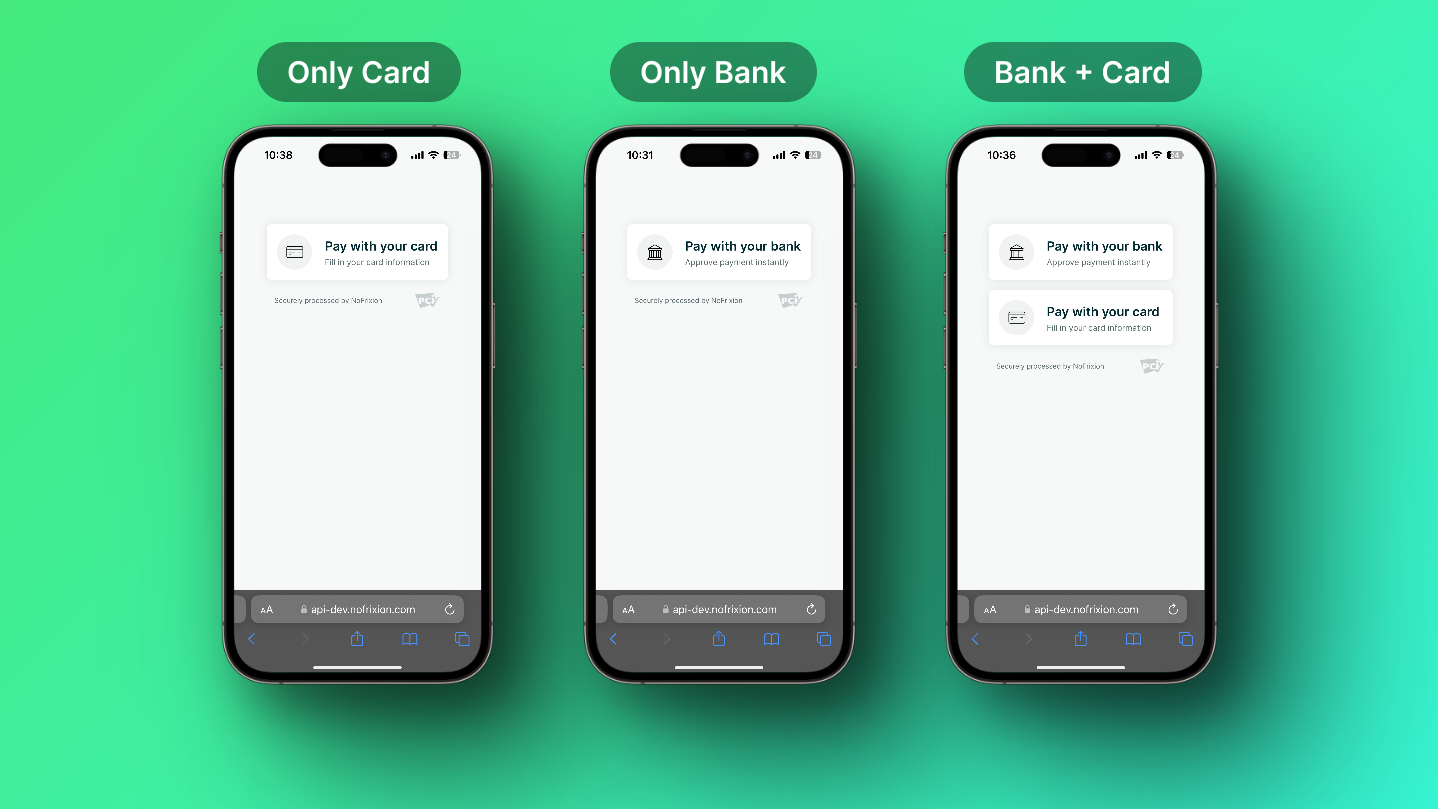
Image displaying pay element with different methods enabled
🚀 Demo
🧐 I still have questions
We hope that this guide has been helpful to you in implementing the NoFrixion Pay Element Web Component.
If you have any further questions or issues, please do not hesitate to reach out to our support team for assistance.
Updated over 1 year ago